Matcaps in Blender Cycles
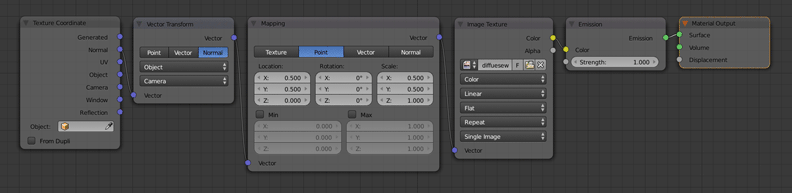
To make a material that uses matcap there are a few nodes that need’s to be set up.
Texture Coordinate
Leave as default.
Vector Transform
Link ‘Normal’ from the ‘Texture Coordinate node’ into ‘Vector’.
Choose ‘Normal’.
Set ‘Convert from’ to ‘Object’.
Set ‘Convert to’ to ‘Camera’.
Mapping
Choose ‘Point’ (should be the default).
Set ‘Location’ to ‘X: 0.500, Y: 0.500, Z: 0.000’.
Set ‘Rotation’ to ‘X: 0, Y: 0, Z: 0’ (should be the default).
Set ‘Location’ to ‘X: 0.500, Y: 0.500, Z: 1.000’.
Image Texture
Link ‘Vector’ from the ‘Mapping node’ to ‘Vector’.
Load in your matcap image.
Set ‘Color-space’ to ‘Color’ (should be the default).
Set ‘Interpolation’ to ‘Linear’ (should be the default).
Set ‘Projection’ to ‘Flat’ (should be the default).
Set ‘Extension’ to ‘Repeat’ (should be the default).
Set ‘Source’ to ‘Single Image’ (should be the default).
Emission
Link ‘Color’ from the ‘Image Texture node’ to ‘Color’.
Set ‘Strength’ to ‘1.000’ (should be the default).
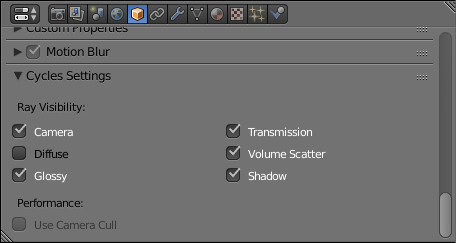
The reason to use an ‘Emission node’ here is so the scenes lighting won’t affect the object’s shading. You can also turn off the Transmission under an object’s ‘Cycles Settings’.
Material Output
Link ‘Emission’ from the ‘Emission node’ to ‘Surface’.
You are done!